Easy Garlic Bread Rolls – So Soft & Flavorful
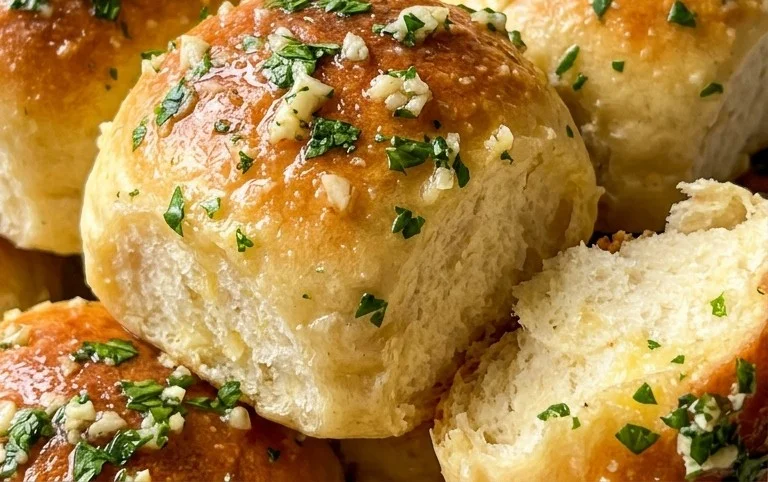
Garlic bread rolls are more than just a side dish; they’re a warm, fragrant invitation to pure comfort. There’s something undeniably magical about that golden crust, the soft, pillowy interior, and that non-intoxicating aroma of roasted garlic mingling with butter and herbs. It’s no wonder that these garlic bread rolls hold such a special place in our hearts and on our tables. They have a way of transforming any meal into an occasion, a simple dinner into a feast. What makes them so beloved? It’s the perfect marriage of textures – the slight crunch of the baked exterior giving way to the tender dough within, all infused with that savory, garlicky goodness. And when you add a whisper of parsley or a sprinkle of parmesan, these humble garlic bread rolls truly become extraordinary. They’re the ultimate crowd-pleaser, guaranteed to vanish in minutes!

Garlic Bread Rolls
There’s something undeniably comforting about warm, buttery, garlicky bread. And while a classic loaf is fantastic, bite-sized garlic bread rolls are an absolute game-changer for appetizers, side dishes, or even just a satisfying snack. These aren’t your average grocery store rolls; these are homemade delights that are soft, fluffy, and bursting with incredible flavor. They’re perfect for sopping up your favorite sauces, accompanying a hearty pasta dish, or simply enjoying on their own. The aroma that fills your kitchen as these bake is simply divine, and the taste? Well, let’s just say you’ll be asked for the recipe. Let’s get started on creating these irresistible little bundles of joy!
Ingredients:
- 4 1/2 tablespoons unsalted butter, softened
- 2 tablespoons minced garlic (about 4-6 cloves)
- 3 1/2 cups + 1 tablespoon all-purpose flour (*See notes below for measuring*)
- 3 tablespoons chopped fresh parsley, divided
- 1 tablespoon granulated sugar
- 2 1/4 teaspoons instant yeast
- 1 teaspoon fine sea salt
- 1 cup whole or 2% milk (warmed to 110°F)
- 1 large egg (room temperature)
- 1 beaten egg, for brushing the tops
- 2 tablespoons unsalted butter, melted
- 1 tablespoon minced garlic (about 2-3 cloves)
- 1 tablespoon chopped fresh parsley
- Flaky sea salt, for finishing
*Notes on Measuring Flour: To ensure your rolls have the perfect texture, it’s best to measure your flour correctly. Do not scoop directly from the bag with your measuring cup, as this can compact the flour and lead to dry, dense rolls. Instead, lightly spoon the flour into your measuring cup until it’s overflowing, then level it off with the back of a knife or an offset spatula. For the most accurate results, consider using a kitchen scale. 3 1/2 cups of all-purpose flour typically weighs around 420-450 grams.
Making the Dough
The journey to perfect garlic bread rolls begins with a simple yet magical dough. This recipe uses instant yeast, which is incredibly user-friendly and doesn’t require proofing in liquid beforehand. This makes the process more streamlined and less prone to error. The warmth of the milk is crucial; too hot and you’ll kill the yeast, too cold and it won’t activate properly. Aim for a temperature that feels comfortably warm to the touch, around 105-115°F. The room temperature egg also incorporates more smoothly into the dough.
- In a small bowl, combine the 4 1/2 tablespoons of softened unsalted butter with 2 tablespoons of minced garlic and 3 tablespoons of chopped fresh parsley. Mash these ingredients together with a fork until well combined. This forms your flavorful garlic-herb butter that will be incorporated into the dough, infusing every bite with deliciousness. Set this aside.
- In the bowl of a stand mixer fitted with the dough hook attachment, or in a large mixing bowl if kneading by hand, combine the 3 1/2 cups + 1 tablespoon of all-purpose flour, granulated sugar, instant yeast, and fine sea salt. Whisk them together briefly to distribute the yeast and salt evenly.
- Pour in the warmed milk and add the room temperature egg.
- Add the prepared garlic-herb butter mixture to the bowl.
- Begin mixing the ingredients on low speed (or with a sturdy spoon if mixing by hand) until a shaggy dough starts to form. Once the dough begins to come together, increase the speed to medium-low (or turn the dough out onto a lightly floured surface if kneading by hand) and knead for about 8-10 minutes. The dough should become smooth, elastic, and slightly sticky. It should pull away from the sides of the bowl. If it seems too sticky, add a tablespoon of flour at a time. If it seems too dry, add a teaspoon of milk at a time. Proper kneading develops the gluten, which is essential for that lovely fluffy texture in your rolls.
First Rise: Letting the Magic Happen
After all that kneading, it’s time for the dough to rest and rise. This is where the yeast gets to work, creating those airy pockets that make the rolls so light and tender. Patience is key here; don’t be tempted to rush this process.
- Lightly grease a clean large bowl with a little oil or cooking spray. Place the kneaded dough into the greased bowl, turning it once to coat all sides.
- Cover the bowl tightly with plastic wrap or a clean kitchen towel. Place the bowl in a warm, draft-free place to rise for 1 to 1 1/2 hours, or until the dough has doubled in size. A slightly turned-off oven with the light on is often a good spot for this. You’ll know it’s ready when it looks plump and jiggly.
Shaping and Second Rise
Once the dough has had its first glorious rise, it’s time to transform it into individual rolls. This is the part where you can make them as uniform as you like, or embrace a more rustic, charming look.
- Once the dough has doubled, gently punch it down to release the air. Turn the dough out onto a lightly floured surface.
- Divide the dough into 12 equal portions. You can do this by weighing the dough and dividing by 12 for precision, or by eye. Roll each portion into a smooth ball. You can pinch the edges underneath to create a taut surface.
- Arrange the dough balls into a greased 9×13 inch baking pan, leaving a little space between each one as they will expand further.
- Cover the pan loosely with plastic wrap or a kitchen towel and let the rolls rise for another 30-45 minutes, or until they are puffy and have almost doubled in size again. They should be touching each other by the end of this rise.
Baking to Golden Perfection
The final stage is baking, where the magic truly culminates. The aroma of garlic and butter will intensify, promising pure deliciousness. The simple egg wash ensures a beautiful golden-brown crust.
- Preheat your oven to 375°F (190°C).
- In a small bowl, whisk together the melted 2 tablespoons of unsalted butter with 1 tablespoon of minced garlic and 1 tablespoon of chopped fresh parsley. This is your luscious topping that will be brushed over the rolls right before baking.
- Once the rolls have finished their second rise, brush the tops generously with the beaten egg. This egg wash will give them a beautiful sheen and a golden-brown hue.
- Drizzle the melted garlic-herb butter mixture evenly over the tops of the risen rolls. Don’t be shy; this is where a lot of that incredible flavor comes from!
- Sprinkle the tops with a pinch of flaky sea salt. The flaky salt provides a delightful textural contrast and enhances the savory flavors.
- Bake for 18-25 minutes, or until the rolls are golden brown and sound hollow when tapped on the bottom. Keep an eye on them towards the end of baking, as ovens can vary.
- Remove the pan from the oven and let the garlic bread rolls cool in the pan for a few minutes before transferring them to a wire rack to cool slightly more. They are best served warm.
Enjoy these heavenly garlic bread rolls! They are perfect on their own, as a side to your favorite Italian dishes, or to impress guests. The combination of soft, pillowy bread with that irresistible garlic and herb flavor is truly unbeatable.
Conclusion:
I hope you’re as excited to try this garlic bread rolls recipe as I am to share it! These aren’t just any garlic bread rolls; they’re incredibly fluffy, bursting with buttery garlic flavor, and have that perfect slightly crispy exterior. They’re surprisingly simple to make, making them an ideal addition to any weeknight meal or a star attraction at your next gathering. The aroma alone while they’re baking is enough to make your kitchen feel like the coziest place on earth!
These versatile rolls are fantastic alongside pasta dishes, soups, stews, or even just as a delicious appetizer with a side of marinara sauce. For variations, consider adding a sprinkle of fresh parsley or chives to the butter mixture, or even a pinch of red pepper flakes for a subtle kick. Don’t be afraid to experiment with different cheeses too – a touch of grated Parmesan or mozzarella can elevate them further. I truly encourage you to give these a whirl; I’m confident they’ll become a fast favorite in your recipe repertoire.
Frequently Asked Questions:
Can I make these garlic bread rolls ahead of time?
Yes, you absolutely can! You can prepare the dough and let it rise, then shape and refrigerate it overnight. In the morning, let it sit at room temperature for about 30 minutes before baking. Alternatively, you can bake them and then gently reheat them in the oven or a toaster oven before serving.
What’s the best way to store leftover garlic bread rolls?
Store any leftover rolls in an airtight container at room temperature for up to two days. For longer storage, wrap them tightly in plastic wrap and then foil, and freeze them for up to a month. Reheat them in a 350°F (175°C) oven until warmed through.
Garlic Bread Rolls
Soft and savory garlic bread rolls, perfect as a side dish or a simple snack.
Ingredients
-
4 1/2 tablespoons unsalted butter
-
2 tablespoons minced garlic
-
3 1/2 cups + 1 tablespoon all-purpose flour
-
3 tablespoons chopped fresh parsley
-
1 tablespoon granulated sugar
-
2 1/4 teaspoons instant yeast
-
1 teaspoon fine sea salt
-
1 cup whole or 2% milk (warmed to 110°F)
-
1 large egg (room temperature)
-
1 beaten egg, for brushing the tops
-
2 tablespoons unsalted butter
-
1 tablespoon minced garlic
-
1 tablespoon chopped fresh parsley
-
flaky sea salt (for finishing)
Instructions
-
Step 1
In a small saucepan, melt 4 1/2 tablespoons butter over low heat. Stir in 2 tablespoons minced garlic and cook for 1 minute until fragrant. Remove from heat and let cool slightly. -
Step 2
In a large bowl, whisk together the flour, sugar, yeast, and salt. Make a well in the center and pour in the warmed milk, 1 large egg, and the cooled garlic-butter mixture. Mix until a shaggy dough forms. -
Step 3
Turn the dough out onto a lightly floured surface and knead for 5-7 minutes, or until smooth and elastic. Place the dough in a greased bowl, cover, and let rise in a warm place for 1 hour, or until doubled in size. -
Step 4
Punch down the dough and divide it into 12 equal portions. Shape each portion into a ball and place them on a parchment-lined baking sheet, leaving some space between them. -
Step 5
Cover the rolls and let them rise for another 30 minutes. -
Step 6
Preheat oven to 375°F (190°C). Melt the remaining 2 tablespoons butter. Stir in 1 tablespoon minced garlic and 1 tablespoon chopped fresh parsley. Brush the tops of the risen rolls with this mixture. -
Step 7
Bake for 15-18 minutes, or until golden brown and cooked through. Sprinkle with flaky sea salt immediately after removing from the oven.
Important Information
Nutrition Facts (Per Serving)
It is important to consider this information as approximate and not to use it as definitive health advice.
Allergy Information
Please check ingredients for potential allergens and consult a health professional if in doubt.